User Guide
Welcome to TrAcker! This is a handy contact management app built for Computer Science Head Teaching Assistants (CS Head TAs) in NUS. Optimised for use via a command line interface, you can manage student assignments, attendance, tutor availability and much more with just a few keystrokes!
About this User Guide
We designed this User Guide to bring you through the functionalities of TrAcker step-by-step!
If you are a ![]() first-time user, we’re excited to have you onboard! We recommend you to follow our User Guide
sequentially to get yourself up to speed.
first-time user, we’re excited to have you onboard! We recommend you to follow our User Guide
sequentially to get yourself up to speed.
Throughout the user guide, we have added some extra information for additional clarity!
If you are an ![]()
![]()
![]() experienced user, skip ahead to Command summary
for a quick refresher.
experienced user, skip ahead to Command summary
for a quick refresher.
Quick start
-
Ensure you have Java
11or above installed in your Computer. -
Download the latest
TrAcker.jarfrom here. -
Copy the file to the folder you want to use as the home folder for your TrAcker app.
-
Open a command terminal,
cdinto the folder you put the jar file in, and use thejava -jar TrAcker.jarcommand to run the application.
The GUI with some sample data should appear in a few seconds:

-
Type the command in the command box and press Enter to execute it.
Some example commands you can try:-
list: Lists all contacts. -
add stu /n John Doe /i A0123456Y /p 91234567 /e johndoe@ex.com: Adds the StudentJohn Doeto your contact list. -
add ta /n Jane Smith /i A0654321Y /p 97654321 /e janesmith@ex.com: Adds the TAJane Smithto your contact list. -
delete 3: Deletes the 3rd contact shown in the displayed list. -
clear: Deletes all contacts. -
exit: Exits the app.
-
-
If a command is not recognized, a message containing the correct usage of the command will be shown.
-
Head to Features below for details of each command.
Basic Features
While using TrAcker for the first time might be overwhelming, fret not as we are here to guide you through. Let’s go through the basic commands to get you started!
* You can press
Enter or / to activate input field and start typing when the TrAcker window is in focus. This is provided that there is no popup window demanding attention.
![]() Notes about the command format:
Notes about the command format:
-
Words in
UPPER_CASEare the parameters to be supplied.
e.g. inadd stu /n NAME,NAMEis a parameter that can be used asadd stu /n John Doe. -
Parameters with
...after them can be supplied zero, one or more times.
e.g.[/t TAG...]can be used as/t Assignment1or/t Assignment1 Assignment2(Assignment1andAssignment2would be treated as two different tags. Refer to the Tagging section for more information). -
Items in square brackets are optional.
e.g./n NAME [/p PHONE]can be used as/n John Doe /p 91234567or as/n John Doe. -
The vertical bar or pipe
|is used to denote alternatives. -
Pipe symbol and square brackets together
[|]denote alternative items that are optional.
e.g. inadd [stu | ta] /n NAME,stuandtaare alternatives, either exactly one or none of them should be used. Refer to the Add command section for more information). -
Parameters can be supplied in any order.
e.g. if the command specifies/n NAME /i ID,/i ID /n NAMEis also acceptable and has the same effect. -
Extraneous parameters for single-word commands that do not take in parameters (specifically
help,list,exitandclear) will be ignored.
e.g. if the command specifieshelp 123, it will be interpreted ashelp. -
If you are using a PDF version of this document, be careful when copying and pasting commands that span across multiple lines as space characters surrounding line-breaks may be omitted when copied over to the application.
Adding a Student or TA: add stu, add ta
Adds a Student/TA to the address book.
Format:
-
To add a Student,
add [stu] /n NAME /i ID /p PHONE /e EMAIL -
To add a TA,
add ta /n NAME /i ID /p PHONE /e EMAIL - Every person is saved either as a Student or TA. If the type of the person is not specified, the person will be
saved as a Student by default.
- Each person’s ID is unique, so you cannot add 2 people with the same ID.
Examples:
add stu /n Alex Yeoh /i A0777777L /p 87438807 /e alexyeoh@ex.comadd ta /n Charlotte Oliveiro /i A2222222P /p 93210283 /e charlotte@ex.com
Editing a person : edit
Edits an existing person in the contact book.
Format: edit INDEX [/n NAME] [/p PHONE] [/e EMAIL]
- Edits the person at the specified
INDEX. The index refers to the index number shown in the displayed person list. The index must be a positive integer within the size of the displayed list. - At least one of the optional fields must be provided.
- Existing values will be updated to the input values.
- A person’s
type(stuorta) andIDcannot be edited.
Examples:
-
edit 1 /p 91234567 /e johndoe@example.comEdits the phone number and email address of the 1st person to be91234567andjohndoe@example.comrespectively. -
edit 2 /n Betsy CrowerEdits the name of the 2nd person to beBetsy Crower.
Listing all persons : list
Shows a list of all persons in TrAcker. With this command, you can undo any filtering by previous find commands.
Format: list
Locating persons: find
Filters all persons whose contact details contain the specified keywords under the specified flag and displays them as a list with index numbers.
Format: find [stu | ta] [/n NAME] [/i ID] [/p PHONE] [/e EMAIL] [/t TAGS...]
- At least one of the optional fields must be supplied.
- The search is case-insensitive. e.g.
hanswill matchHans - The order of the keywords under each flag does not matter. e.g.
Hans Bowill matchBo Hans -
Subwords will be matched e.g.
Hanwill matchHans - Between optional fields supplied, the search filters for persons meeting criteria specified for ALL fields at the
same time, (i.e.
ANDsearch). e.g.find stu /n John /i 6Zwill find all Students who have both a name containingJohnand an ID containing6Z.
-
For multiple values (split by space) supplied to the same optional field, the search filters for persons meeting ANY criteria, (i.e.
ORsearch). e.g.find stu /n John Smithwill find all Students who have either a name containingJohnor a name containingSmith. - When performing search for the
TAGSfield (more information on tags here):- For tutorial tags, subword matching is performed
- For other types of tags, it performs full word matching
e.g.
find /t wed assignment1will find all persons with a tutorial tag wherewedis a subword or anassignment1tag
e.g.find stu /n John /t wed assignment1will find all persons with a name containingJohnAND either a tutorial tag wherewedis a subword or anassignment1tag
Examples:
-
find tareturns all TAs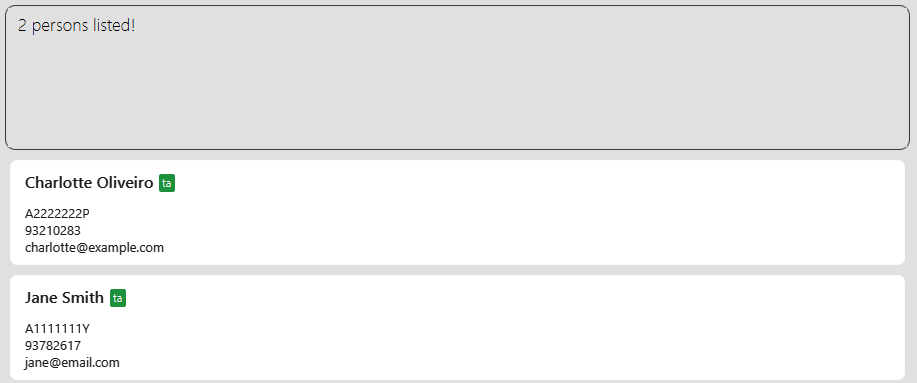
-
find /n JohnreturnsjohnandJohn Doe
Deleting persons : delete
Deletes the person(s) specified by their indices from the displayed person list. A popup will appear to confirm the deletion.
Format: delete (all | INDEX [OTHER_INDICES...])
- Deletes the person(s) at the specified
INDEX. - If
allis used, all persons in the displayed list are deleted. The displayed list might not be the same as the full list. For example, if thedelete allcommand is used after afind NAMEcommand, all contacts found by thefind NAMEcommand would be deleted but not those excluded from the displayed list. - The index must be a positive integer within the size of the displayed list.
Examples:
-
listfollowed bydelete 2deletes the 2nd person in the full contact list. -
find /n Betsyfollowed bydelete 1deletes the 1st person in the results of thefind /n Betsycommand.
* Oops! It looks like you’re about to perform an action that could lead to unintended data loss. No worries though - we’ve got your back! To make sure everything stays safe and sound, we just need a quick confirmation from you.
* We have introduced toggling using your left and right arrow keys, as well as the enter key for increased efficiency.
Clearing all entries : clear
Clears all entries from the address book.
Format: clear
Exiting the program : exit
Exits the program.
Format: exit
Saving the data
Worried about data loss? That is not an issue with TrAcker.
TrAcker data is saved in the hard disk automatically after each command that changes the data. There is no need to save manually.
Editing the data file
TrAcker saves its data as a JSON file [JAR file location]/data/addressbook.json automatically.
Advanced users are welcome to update data directly by editing that data file.
While the app is running, edits to the addressbook.json file will not be reflected in the UI.
To view the changes, rerun the application.
* If your changes to the data file renders its format invalid, TrAcker will discard all existing data and start with an empty data file in the next run. Hence, it is recommended to have a backup of the data file before editing it.
* Furthermore, certain edits can cause TrAcker to behave in unexpected ways (e.g., if a value entered is outside the acceptable range). Therefore, please edit the data file only if you are confident that you can update it correctly.
Tagging
Forget the hassle ![]() of managing administrative tasks as the Head TA! With TrAcker tags, you can conveniently track
students’ assignment completion status, their assigned tutorial groups as well as their tutorial attendance records.
You are also able to track TA’s assigned tutorial slots and their availability for other tutorial slots in case
substitutions are needed.
of managing administrative tasks as the Head TA! With TrAcker tags, you can conveniently track
students’ assignment completion status, their assigned tutorial groups as well as their tutorial attendance records.
You are also able to track TA’s assigned tutorial slots and their availability for other tutorial slots in case
substitutions are needed.
TrAcker allows the use of three different types of tags - Assignment, Attendance, and Tutorial - which can be attached to Students and TAs. The different tag types along with their corresponding tag statuses are described below.
Tag Status
| Tag type | Status |
|---|---|
| Assignment |
cg : COMPLETE_GOOD (completed before deadline)cb : COMPLETE_BAD (completed after deadline)ig : INCOMPLETE_GOOD (incomplete before deadline)ib : INCOMPLETE_BAD (incomplete after deadline) |
| Attendance |
p : PRESENTa : ABSENTawr : ABSENT_WITH_REASON
|
| Tutorial |
as : ASSIGNEDav : AVAILABLE
|
Tag Name
Regardless of tag type, tag names must abide by the following constraints:
- must be alphanumeric
- no whitespace between words in the tag
- tags attached to each person must have unique names (each person can only have one tag of a specific name, regardless of tag types. But tags of the same name can be attached to different contacts)
Here are some recommended tag names for the various tag types.
| Tag type | Examples of recommended tag names |
|---|---|
| Assignment |
Assignment1 MockPE
|
| Attendance |
Week1 Week2
|
| Tutorial |
TUE08 WED10 THU09
|
Marking a tag : mark
Updates the status of the specified tag with the specified status for the specified person(s). If the tag specified does not yet exist for the person(s), a new tag with the tag name and tag status will be created and attached to the person(s).
* The type of the tag(s) to be updated/created are specified through their tag status.
* If a tag is to be marked with the status
cg, cb, ig or ib, it would be identified as an assignment tag and displayed together with other assignment tags in the UI. Similarly for attendance and tutorial tags. * If a specific person(s) already has a tag with the same tag name as the tag that is to be marked, but his existing tag has a different tag type as the type identified by new status from the mark command, his original tag would then be replaced by the tag with new type and status but the same tag name.
Format: mark (all | INDEX [OTHER_INDICES...]) /t TAG [OTHER_TAGS...] /ts TAG_STATUS
- The index refers to the index number shown in the displayed person list.
- The index must be a positive integer within the size of the displayed list.
- When
allis used, the command will apply to all persons in the displayed list. - When multiple
TAGs are specified, the sameTAG_STATUSwill be applied to all the tags. -
TAG_STATUSmust be one of the above specified values
Examples:
-
mark 1 /t Assignment1 /ts cgupdates theAssignment1tag to COMPLETE_GOOD for the 1st person in the displayed list if they already have the tag. TheAssignment1tag of COMPLETE_GOOD status would be added to the contact if they previously did not have the tag. -
mark 2 3 /t week1 week2 /ts awrupdates theweek1andweek2tags to ABSENT_WITH_REASON for the 2nd and 3rd persons in the displayed list if they already have the tag. Both tags with specified status would be added to the two contacts if any of them previously did not have the tags. -
mark all /t TUE08 /ts asupdates theTUE08tag to ASSIGNED to assign every person in the displayed list to the tutorial group TUE08 if they already have the tag. TheTUE08tag with specified status would be added to any listed contact that previously did not have the tag.
For Tutorial tags, the tutorial name must be that of a valid Tutorial tag in the list of available tutorial sessions defined with the tuttag command. For example, in the third example above,
TUE08 should be added as a tutorial tag first using tuttag add /t TUE08.
Adding a Tutorial: tuttag add
Adds the specified Tutorial tag to the list of valid Tutorial tags. Tutorial tags (identified by Tutorial tag names) not from the valid Tutorial tag list cannot be used.
Format: tuttag add /t TAG
Examples:
-
tuttag add /t TUE08adds TUE08 as a valid Tutorial tag.
Deleting a Tutorial: tuttag del
Deletes the specified Tutorial tag from the valid Tutorial tag list. If the specified tag does not exist in the list, no change would happen.
Warning: All persons with the Tutorial tag (identified by tag name, regardless of tag status) will also have the Tutorial tag removed should this command execute successfully. However, if the tag the person has is of the same specified tag name but of a tag type other than Tutorial (it is an Assignment or Attendance tag), this tag would not be removed.
Format: tuttag del /t TAG
Examples:
-
tuttag del /t WED09deletes WED09 from the valid Tutorial tag list, and removes the WED09 Tutorial tag from all persons.
Listing All Tutorials: tuttag list
Lists all valid Tutorial tags in TrAcker.
Format: tuttag list
Removing a tag: removetag
Removes an individual tag of the specified tag name (regardless of tag type) from a person. If the specified tag does not exist, the person’s tags would remain unchanged.
Format: removetag (all | INDEX [OTHER_INDICES...]) /t TAG
- The index refers to the index number shown in the displayed person list.
- The index must be a positive integer within the size of the displayed list.
- If the person does not have the specified tag, the command will leave the person unchanged.
Examples:
-
removetag 1 /t Assignment1removes theAssignment1tag from the 1st person in the displayed list. -
removetag 2 3 /t Assignment2removes theAssignment2tag from the 2nd and 3rd person in the displayed list. -
removetag all /t Assignment3removes theAssignment3tag from every person in the displayed list.
Locating available TAs for a tutorial group: available
Filters and lists all TAs who are available for (and not assigned to) a specified tutorial session to serve as replacement TAs.
Format: available /g TUTORIAL
* Only one Tutorial tag name can be specified per
available command. * Thus, after each
/g flag, there can only be one Tutorial tag name specified, i.e. available /g WED10 THU10 is an invalid input. * There can also only be one ‘/g’ flag supplied per
available command. If more than one /g flag is supplied within the same available command,
only the tag name after the last /g will be processed, i.e. in available /g WED10 /g THU10, only THU10
will be taken in as a parameter while WED10` will be ignored.
- The search is case-sensitive and must match the specified tutorial group exactly.
Examples:
-
available /g TUE08returns all TAs who are available for tutorial groupTUE08
Viewing help : help
Prompts a popup containing the link to the user guide.

Format: help
FAQ
Welcome to our FAQ section! Here, we’ve gathered answers to the questions we hear most often from our users. If you can’t find what you’re looking for, feel free to reach out to us directly.
Q: How do I transfer my data to another computer?
A: Install the app in the other computer and overwrite the data file it creates with the file that
contains the data of your previous TrAcker home folder.
Known issues
![]() Heads-up, we’re aware of a few hiccups that some users might be experiencing. Don’t worry, our team is
working hard to squash those bugs! Meanwhile, here are some workarounds for you:
Heads-up, we’re aware of a few hiccups that some users might be experiencing. Don’t worry, our team is
working hard to squash those bugs! Meanwhile, here are some workarounds for you:
-
When using multiple screens, if you move the application to a secondary screen, and later switch to using only the primary screen, the GUI will open off-screen. The remedy is to delete the
preferences.jsonfile created by the application before running the application again.
Command summary
| Action | Format, Examples |
|---|---|
| Add | add [stu | ta] /n NAME /i ID /p PHONE /e EMAIL e.g., add stu /n Alex Yeoh /i A0777777L /p 87438807 /e alexyeoh@example.com
|
| List | list |
| Edit | edit INDEX [/n NAME] [/p PHONE] [/e EMAIL] e.g., edit 1 /p 91234567 /e johndoe@example.com
|
| Find | find [stu | ta] [/n NAME] [/i ID] [/p PHONE] [/e EMAIL] [/t TAGS…] e.g., find /t wed assignment1
|
| Delete | delete (all | INDEX [OTHER_INDICES…]) e.g., delete 3
|
| Clear | clear |
| Exit | exit |
| Mark | mark (all | INDEX [OTHER_INDICES…]) /t TAG [OTHER_TAGS…] /ts TAG_STATUS e.g., mark 1 /t Assignment1 /ts cg
|
| Create Valid Tutorial Tag | tuttag add /t TAG e.g., tuttag add /t TUE08
|
| Delete Valid Tutorial Tag | tuttag del /t TAG e.g., tuttag del /t WED09
|
| List Valid Tutorial Tags | tuttag list |
| Remove Tag | removetag INDEX /t TAG e.g., removetag 1 /t Assignment1
|
| Available | available /g TUTORIAL e.g., available /g TUES08
|
| Help | help |